与 UIKit 使用多种多样的控件布局不同,SwiftUI 的布局主要是使用各种 View(视图) 和 Modifier(修饰符) 来设置页面布局。在 UIKit 中,我们使用控件的各种属性来构建 UI,而 SwiftUI 中,我们用 Modifier 来修饰 View 来达到同样的目的。实际上,大部分 SwiftUI 中的 View 和 UIKit 中的控件是有对应关系的,我们在学习的时候只要掌握好这种对应关系即可。本文开始就梳理一下 SwiftUI 中常见的 View 和 Modifier。
Text
Text 即为显示文字的 View,对应 UIKit 中的 UILabel。
struct ContentView: View {
    var body: some View {
        Text("Hello SwiftUI")
            .font(.title) //字体大小
            .foregroundColor(.orange) //字体颜色
            .bold() //加粗
            .italic() //斜体
            .underline() //下划线
            .lineLimit(2) //行数,若为nil则不限行数
    }
}
如果说我们有多行文本,可以通过 .multilineTextAlignment 修饰符来设置多行文本之间的对齐方式。
struct ContentView: View {
    var body: some View {
        Text("Hello\nSwiftUI")
            .multilineTextAlignment(.center)
    }
}
在以往的 UIKit 中,我们若想要实现将不同样式的文本拼接在一起,就必须用到 NSAttributedString。但在 SwiftUI 中就非常容易,只要把两个 Text 用“+”拼接起来即可。
struct ContentView: View {
    var body: some View {
        Text("Hello ")
            .foregroundColor(.red) +
        Text("SwiftUI")
            .bold()
            .italic()
    }
}
需要注意的是,第四行的加号不能省略,否则就违反了上一篇文章所讨论的 “返回 some修饰的协议时返回值类型必须确定”。
当 Text 中的文本特别长时,我们可以设置一些截断方式。
struct ContentView: View {

    var name: String = "SwiftUI是一门非常新的技术,我们一定要好好学习。"

    var body: some View {
        //长文本
        Text(self.name)
            .frame(width:160, height: 50)
            //.truncationMode(.head) //头部截断
            //.truncationMode(.middle) //中部截断
            //.truncationMode(.tail) //默认尾部截断
    }
}
同时,我们可以通过设置 .minimumScaleFactor 修饰符,在当 Text 文本显示不下的时候通过缩小字号来使得文字显示全。
struct ContentView: View {

    var name: String = "SwiftUI是一门非常新的技术,我们一定要好好学习。"

    var body: some View {
        //长文本
        Text(self.name)
            .frame(width:160, height: 50)
            .minimumScaleFactor(0.5) //括号里的参数指定该View允许的最小文本缩放比例,会根据情况自动调整
    }
}
通过使用 lineSpacing 来控制多行文本之间的行间距。
struct ContentView: View {

    var name: String = "SwiftUI是一门非常新的技术,我们一定要好好学习。"

    var body: some View {

        Text(self.name)
            .frame(width:160, height: 70)
            .lineSpacing(20)
    }
}
若我们要控制文本中的字符间距,可以使用 tracking 或 kerning 修饰符。tracking 会拉开连字符,而 kerning 不会;kerning 会留下一些尾随空白,而 tracking 不会。
struct ContentView: View {
    var body: some View {
        VStack {
            //显示为 f fi
            Text("ffi")
                .font(.custom("AmericanTypewriter", size: 70))
                .kerning(50)
            //显示为 f f i
            Text("ffi")
                .font(.custom("AmericanTypewriter", size: 70))
                .tracking(50)
        }
    }
}
padding()
padding 用于设置一个 View 周围的填充。在不设置参数的情况下,可以获得所有方向上系统提供的默认填充。
struct ContentView: View {
    var body: some View {
        Text("Hello SwiftUI")
            .padding()
    }
}
当然我们也可以自定义填充的方向和大小。
struct ContentView: View {
    var body: some View {
        Text("Hello SwiftUI")
            .padding(.bottom, 100)
    }
}
frame()
和 UIKit 类似,frame 修饰符用于显式指定一个 View 的大小(但是不能指定 View 的坐标了)。我们可以直接在构造函数中传入 width 和 height 指定 View 的宽高,也可以传入 minWidth、idealWidth、maxWidth、minHeight、idealHeight、maxHeight 来进行更加个性化的设置(若不指定就采用系统默认值)。还可以根据需要设置对齐方式 alignment。
struct ContentView: View {
    var body: some View {
        Text("666")
            .frame(width: 100, height: 50, alignment: .bottomLeading) //文字设在100x50区域的左下角
    }
}
Shape
Shape 是 SwiftUI 中新增的一个 View,用来表示形状。
struct ContentView: View {
    var body: some View {
        VStack {
            //矩形
            Rectangle()
                .foregroundColor(Color.red)
                .padding()
            //圆角矩形
            RoundedRectangle(cornerSize: CGSize(width: 10,height: 10))
                .foregroundColor(Color.blue)
                .frame(height:200)
            //圆形
            Circle()
                .foregroundColor(Color.yellow)
            //椭圆
            Ellipse()
                .foregroundColor(Color.pink)
                .frame(height:200)
            //胶囊型
            Capsule()
                .fill(Color.green)
                .frame(width: 200, height: 50)
        }
    }
}
还记得当初做红家面试题的时候,题目要求是将一个正方形切圆。在 SwiftUI 中,我们可以使用 .clipShape 修饰符轻松实现:
struct ContentView: View {
    var body: some View {
        Rectangle()
            .foregroundColor(Color.red)
            .frame(width: 100, height: 100)
            .clipShape(Circle())
    }
}
Color
颜色在 SwiftUI 中也是一种 View。
struct ContentView: View {
    var body: some View {
        Color.pink
            .frame(width: 200, height: 100)
            .padding()
    }
}
HStack
HStack 代表水平容器,用于处理若干个元素的横向摆放。在 HStack 的构造函数中我们可以传入两个属性:alignment 表示对齐方式、spacing 表示两两间距。
默认情况下,SwiftUI 会针对不同的 View设置默认间距,所以如果不需要,必须显式设为 0。
struct ContentView: View {
    var body: some View {
        HStack(alignment: .center, spacing: 20) {
            Color.red
            Color.blue
        }
    }
}
VStack
VStack 代表垂直容器,用于处理若干个元素的纵向摆放。和 HStack 相同,我们也可以在构造函数中传入 alignment 和 spacing 属性。
struct ContentView: View {
    var body: some View {
        VStack(alignment: .center, spacing: 20) {
            Color.red
            Color.blue
        }
    }
}
ZStack
ZStack 代表 Z 轴容器,可以理解为与屏幕垂直方向的容器。由于与屏幕垂直的方向只有前后之分,故 ZStack 没有 spacing 属性但是仍有 alignment 属性。
struct ContentView: View {
    var body: some View {
        ZStack (alignment: .center){
            Circle()
                .foregroundColor(Color.yellow)
                .frame(width: 50, height: 50, alignment: .center)
            Text("1")
        }
    }
}
HStack、VStack、ZStack 三种容器可以互相嵌套使用,例如下面这个例子。如果一切顺利,你可以在屏幕上看到一个用图形构建的人形。
struct ContentView: View {
    var body: some View {
        VStack (alignment: .center, spacing: 20){
            ZStack {
                Circle()
                HStack {
                    Rectangle()
                        .foregroundColor(Color.red)
                        .frame(width: 50, height: 50)
                        .padding()
                    Rectangle()
                        .foregroundColor(Color.red)
                        .frame(width: 50, height: 50)
                        .padding()
                }
            }
            HStack {
                Capsule()
                    .frame(width: 80)
                Rectangle()
                Capsule()
                    .frame(width: 80)
            }
            HStack {
                RoundedRectangle(cornerRadius: 10)
                    .frame(width: 100)
                RoundedRectangle(cornerRadius: 10)
                    .frame(width: 100)
            }
        }
    }
}
zIndex()
zIndex 为 ZStack 的 Z 轴索引。ZStack 中的 View 是叠加显示的,写在后面的 View 会遮住前面的,可以使用 zIndex 设置。View 的索引,索引大的就会显示在前面。
struct ContentView: View {

    var body: some View {
        ZStack {
            RoundedRectangle(cornerRadius: 30, style: .continuous)
                .frame(width: 300, height: 200)
                .foregroundColor(.red)
                .zIndex(2)

            RoundedRectangle(cornerRadius: 30, style: .continuous)
                .frame(width: 300, height: 200)
                .foregroundColor(.blue)
                .zIndex(1)
        } //此时红色圆角矩形在蓝色圆角矩形的上面
    }
}
Spacer
Spacer 是一个灵活的空间,可大可小,可以智能根据上下文自动设置大小完成空间的填充。
struct ContentView: View {
    var body: some View {
        VStack {
            Color.red
            //空隙(灵活的空间)
            Spacer()
            Color.blue
        }.frame(height: 300)
    }
}
可以通过 frame 修饰符来指定 Spacer 的大小。
struct ContentView: View {
    var body: some View {
        VStack {
            Color.red
            //指定Spacer的大小
            Spacer()
                .frame(height:100)
            Color.blue
        }.frame(height: 300)
    }
}
Divider
Divider 会显示一条分隔线用于分隔内容,其中 VStack 里面的分隔线是水平的、HStack 里面的分隔线是垂直的。
struct ContentView: View {
    var body: some View {
        VStack {
            Color.red
            //水平分隔线
            Divider()
            Color.blue
        }.frame(height: 300)
    }
}
struct ContentView: View {
    var body: some View {
        HStack {
            Color.red
            //垂直分隔线
            Divider()
            Color.blue
        }.frame(height: 300)
    }
}
Image
Image 即为显示图片的 View,对应 UIKit 中的 UIImageView。
struct ContentView: View {
    var body: some View {
        VStack {
            Image("666") //资源图片,需要将图片预先放在工程的Assets.xcassets文件夹中
            Image(systemName: "clock.fill") //系统图片
        }
    }
}
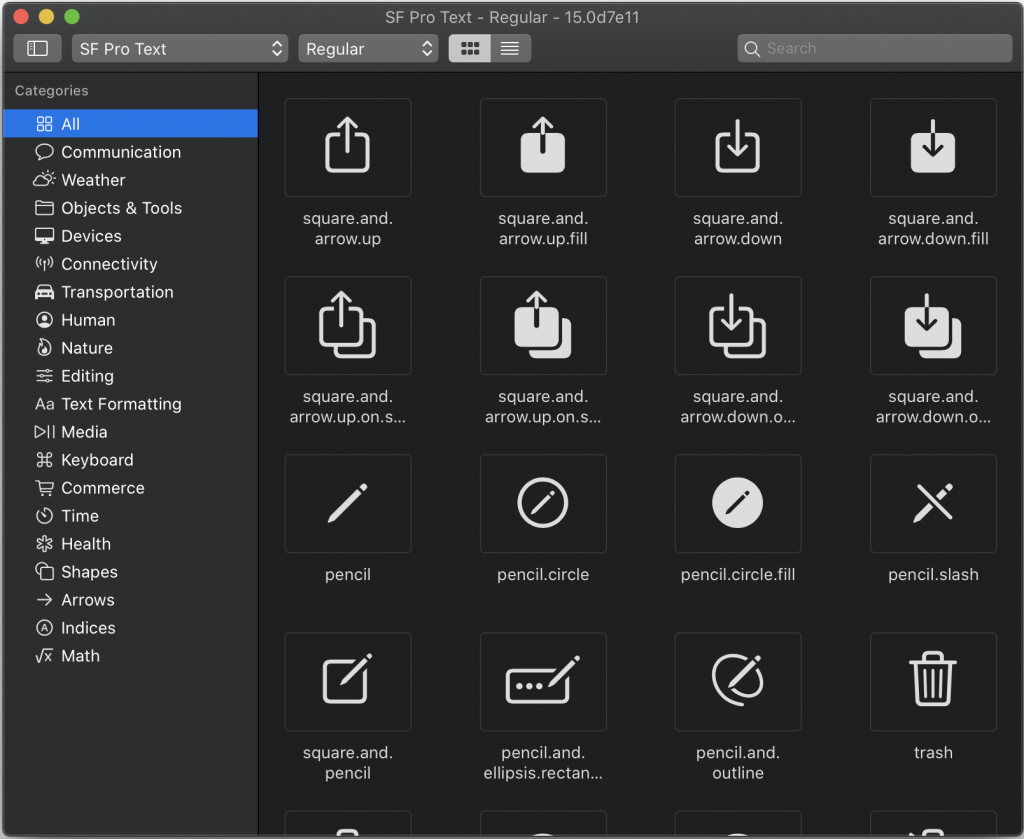
关于系统图片,我们可以前往 Apple 开发者网站 https://developer.apple.com/sf-symbols 下载 sf-symbols APP 来查询某个系统图片的名称。

设置 forgroundColor 修饰符,我们可以改变渲染系统图片的颜色。有的时候系统图片可能默认被渲染成蓝色,我们可用 renderingMode(.original) 修饰符渲染成原图。
struct ContentView: View {
    var body: some View {
        VStack {
            Image(systemName: "clock")
                .foregroundColor(.red)
            Image(systemName: "clock")
                .renderingMode(.original)
        }
    }
}
设置 frame、font 或 imageScale 修饰符,我们可以控制 Image 的大小。其中 font 既可以选择系统预置的大小(比如 .largeTitle、.footnote 等),也可以通过传入 .system(size: ) 的方法传入字号来设置图片大小;而 imageScale 只有三种大小——large、medium、small。
struct ContentView: View {
    var body: some View {
        VStack {
            Image(systemName: "clock")
                .foregroundColor(.red)
                .font(.system(size: 30)) //直接输入字号
//                .font(.largeTitle) //使用系统预置大小
                .padding()
            Image(systemName: "clock")
                .foregroundColor(.red)
                .imageScale(.large)
        }
    }
}
特别地,若我们要用 frame 修饰符来改变图片的大小,我们必须先用 .resizable 修饰符来修饰 Image。
struct ContentView: View {
    var body: some View {
        Image(systemName: "clock")
            .resizable() //一定要有resizable,否则指定frame是无效的
            .foregroundColor(.red)
            .frame(width: 20, height: 20) //指定frame
            .padding()
    }
}
默认情况下,SwiftUI中图片绘制与 frame是无关的,而只会遵从图片本身的大小。如果我们想要图片可以按照所在的 frame缩放,需要添加 resizable()修饰符。
Image 有三种设置显示模式的修饰符——aspectRatio、scaledToFill、scaledToFit。其中 aspectRatio 的第一个参数用于控制图片显示的比例,第二个参数 contentMode 用于控制图片显示是否铺满屏幕(.fill 是充满屏幕、.fit 是根据屏幕大小自适应)。若我们不需要控制图片显示的比例,我们也可以直接使用 scaledToFill、scaledToFit 来设置是否需要铺满屏幕。
struct ContentView: View {
    var body: some View {
        Image(systemName: "clock")
            .resizable() //这边同样要先加resizable修饰符

            //图片充满整个屏幕,下面两种写法是等价的
//            .aspectRatio(contentMode: .fill)
//            .scaledToFill()

            //图片大小自适应,下面两种写法是等价的
//            .aspectRatio(contentMode: .fit)
//            .scaledToFit()

            .aspectRatio(2, contentMode: .fit) //启用第一个参数,设置长宽比
    }
}
我们可以设置一个 Image 为其它 View 的背景。
struct ContentView: View {
    var body: some View {
        Text("Hello SwiftUI")
            .font(.largeTitle)
            .background(
                Image(systemName: "clock")
                    .resizable()
                    .foregroundColor(.red)
                    .frame(width: 100, height: 100))
    }
}
Image 同样支持 .clipShape 修饰符来切割图片的形状。
struct ContentView: View {
    var body: some View {
        Image(systemName: "exclamationmark.square.fill")
            .resizable()
            .frame(width: 100, height: 100)
            .clipShape(Circle()) //切圆
    }
}
下面的代码综合运用了本文的一些知识,设置了一张图片的大小并将其居中屏幕显示。
struct ContentView: View {
    var body: some View {
        VStack(alignment:.leading,spacing: 0){
            Image(systemName: "exclamationmark.square.fill")
                .resizable()
                .scaledToFit()
                .frame(
                    //最大宽度
                    maxWidth: UIScreen.main.bounds.width,
                    //最大高度
                    maxHeight: 300,
                    alignment: .center
            )
        }
    }
}